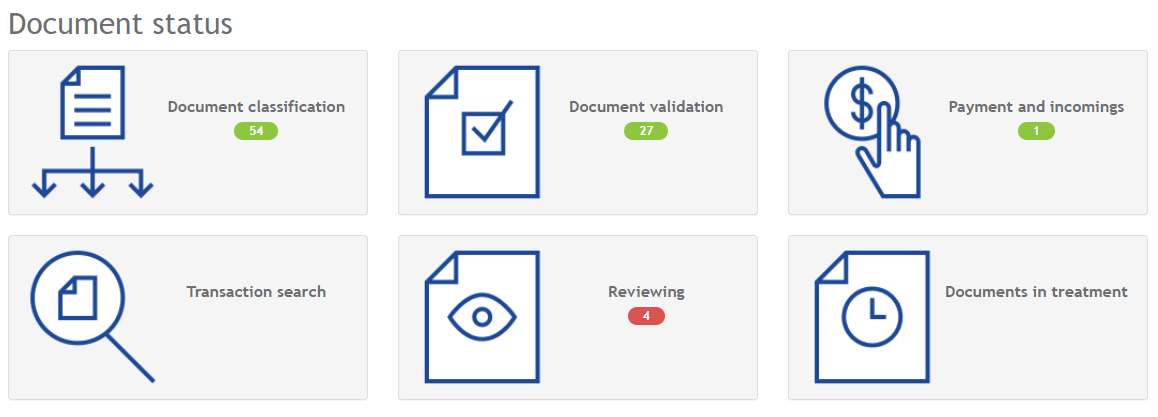
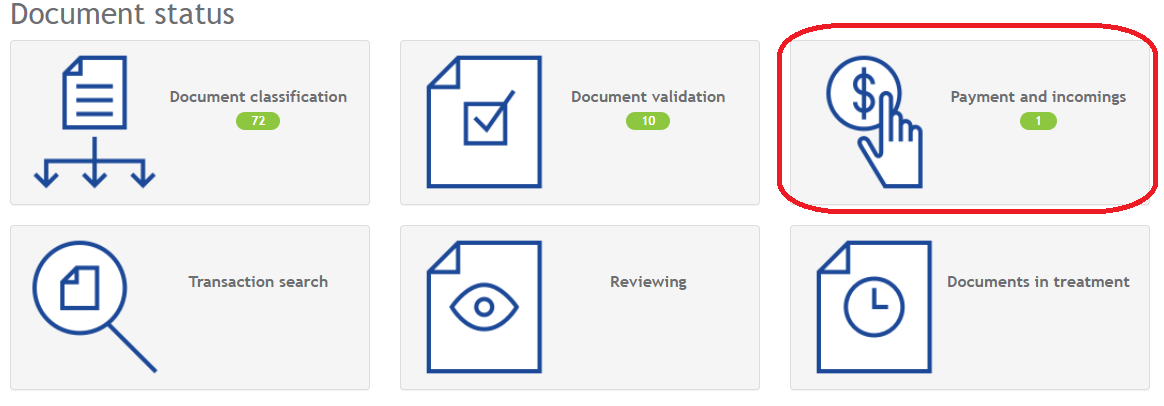
The Accounting tabs’ document status screen is Aleops’ default home page. This page allows you to follow the progress of documents through processing and to access various functions.
The green bubbles indicate the number of pending documents at each stage of processing.
Summary of document processing
Here is a figure summarizing the document processing steps in Aleop:
Document reception
Documents are received either through the company's Aleop email address or EDI.
Aleop email address
The Aleop email address is unique to each company. It is created when opening a company file. You will find it in the “Company” tab, in the “General information” section.
Particularities
This email address (for example: yourfarm@aleop.ca) is only used to automatically retrieve attachments from emails.
You do not have access to the mailbox. It is therefore impossible to read the text that can be entered as a message in the email.
You cannot send emails via this address.
All attached files that are executables (.exe) or considered security-threatening are deleted.
There may be a delay of up to 5 minutes between sending the email and the attachment appearing in Aleop.
Suggested use
Forward emails from your current email to the Aleop address to automatically retrieve attachments.
For partners who do not offer the EDI service, you can ask them to send their email invoice to your current address as well as to the Aleop address to consult the message contained with the email.
Scanner (Kodak model)
The images generated by the scanner with the profiles dedicated to Aleop (1 to 2) are transferred to the company file with Aleop Client. If the “Classify on the Web” box is not checked in the Aleop Client configuration screen documents such as “purchase invoices” and “sales statement” will be sent directly to “Validation”. See Aleop Client- User manual.
Electronic data interchange (EDI)
Some partners offer the automatic transmission of documents to Aleop without going through processing by directing them directly to "Validation". This is the best channel for transmitting accounting documents. It is strongly suggested to activate EDIs available for the company.
Customer service
If the user does not receive email attachments, make sure that he is using his Aleop email address. If the problem persists, escalate the case to technical support 1-855-484-4040.
Document classification (identification)
The Document classification page allows to identify the document type received in the company folder. These are then directed into the desired treatment process. You can select from the following document types:
Purchase invoice
Extraction & Validation
Sales invoice
Extraction & Validation
Manual input – purchase invoice
Validation (Manual)
Manual input – sales invoice
Validation (Manual)
Unclassified documents
Folder/Unclassified documents
Other accounting document
Folder/Accounting
Financials
Folder/Financials
Human resources
Folder/Human resources
Animal production
Folder/Animal production
Plant production
Folder/Plant production
Note: Handwritten invoices with a printed header, GST or provincial tax number are treated as purchase invoices, provided they are visible. Otherwise, it is recommended to use the Manual entry option (free of charge).
Here are some document identification examples:
Aleop document type: Purchase invoice
Normal purchase invoice
Feed, seeds, supplies, etc…
Credit note
Return or discount following a purchase
ASRA, AgriInvest and ASREC
If it is only a contribution without compensation paid.
Account statement with tax amount
Specific to CIAQ.
Aleop document type: Sales invoice
Invoice issued to a customer
Do not process invoices issued by your accounting system (duplicate entry)
Sales statement with or without deductions
Milk sales, animal sales, tax refund or any other money entry
Deposit and advance payment
Milk pay, harvest sales or any other advance payment
ASRA, AgriInvest and ASREC
If a compensation is paid by the program.
Aleop document type: Other accounting document
Account statement without tax amount
Can then be filed in the desired partner's file. Delivery slips, quotes.
Identification of scanned documents
If you checked the “Classify on the Web” box or selected the "To be defined" destination, the documents will be grouped by batch. You must choose the related company and the document type. Other functions allow you to modify the name of documents, view them, or delete them. Click Save the classification of one or more documents.
Identification of electronic (digital) documents
Documents are grouped by Sender. You must choose the company and the document type. The other functions allow you to modify the name of documents, download them or delete them. Click Save to confirm the classification.
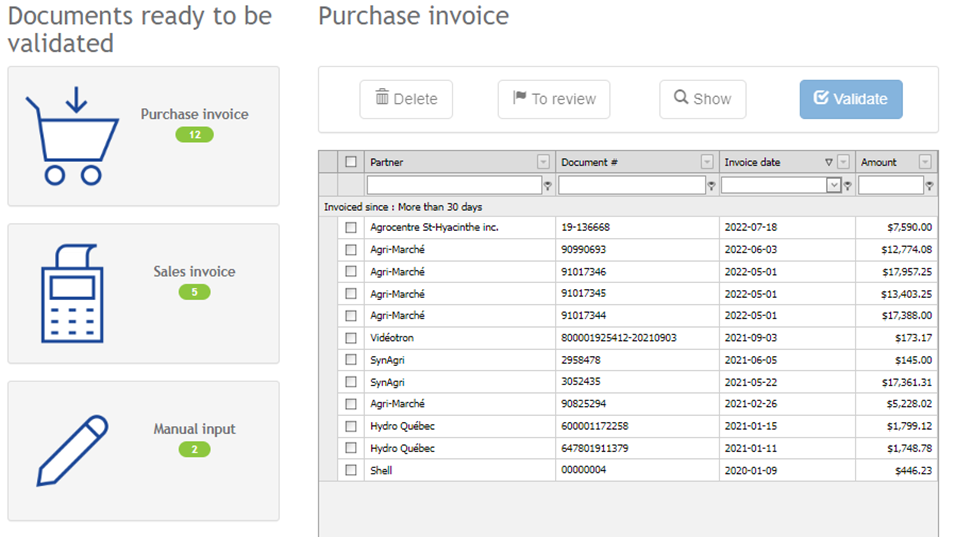
Document validation
Document validation allows you to validate the information extracted by the optical character recognition system (OCR) or to manually enter information from an invoice or sales slip. In this screen, you can choose one or more documents to validate, delete or review.
Validation related functions
Auto-learning based on your accounting practices
As you validate documents in Aleop, the system integrates your preferences to reduce the time required when entering accounting operations. Learning is based on a correspondence between Items/Partner Aleop/Account and accounting software account. Thus, Aleop automatically offers you an entry for the products you buy frequently.
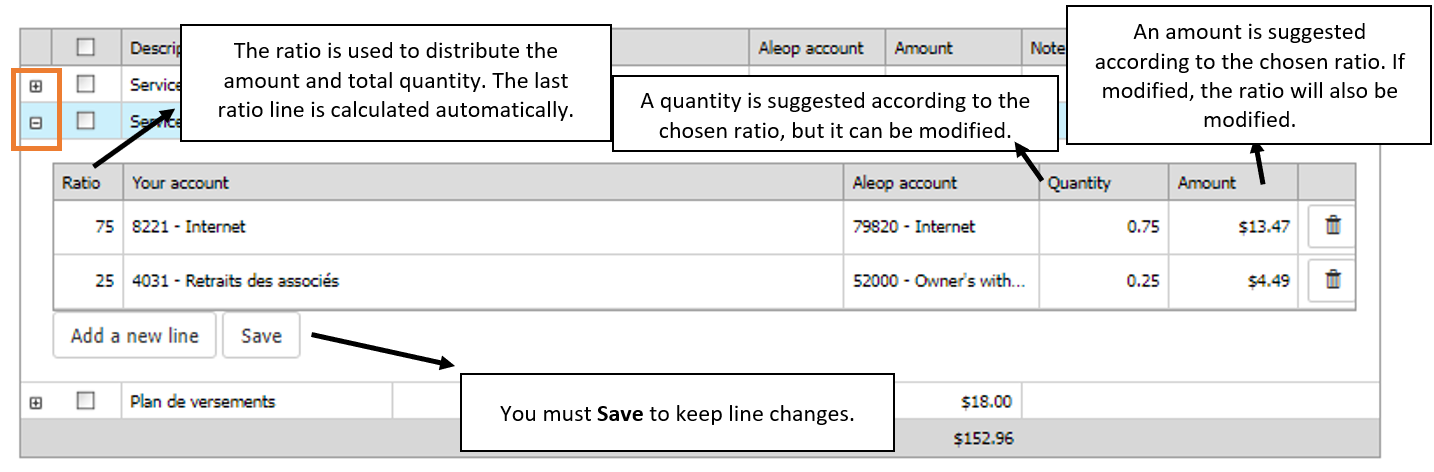
Line split
Click on the + to the left of the item line to display line separation. For example, you can separate phone charges between business and personal use. Aleop learns what line split you enter for a given item and it will automatically show up the next time this item is recognized. (Next image depending on accounting software)
Batch document validation
When you select several documents to validate, you can follow this operation with the progress bar in the right corner of the main menu. By clicking on it, you will have more information on the documents to be validated. You can leave the validation of a batch of documents even if you are not finished. Documents whose validation is completed will be sent to the next processing step.
Purchase invoice
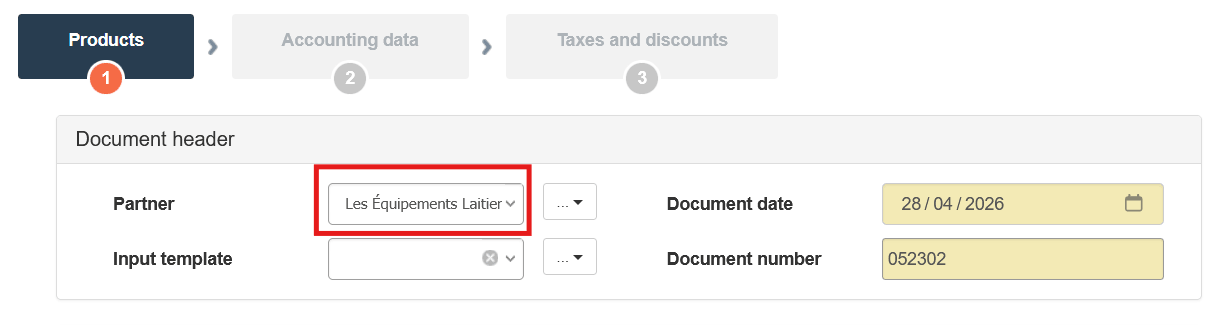
Step 1 — Products: Check that the information in the invoice header and the lines of purchased items are correct. It is at this stage that you can make changes to the information that was read by the OCR.
Note: The items under the Product #, Description, Amount, Quantity and Unit of Measure columns are editable only in this screen.
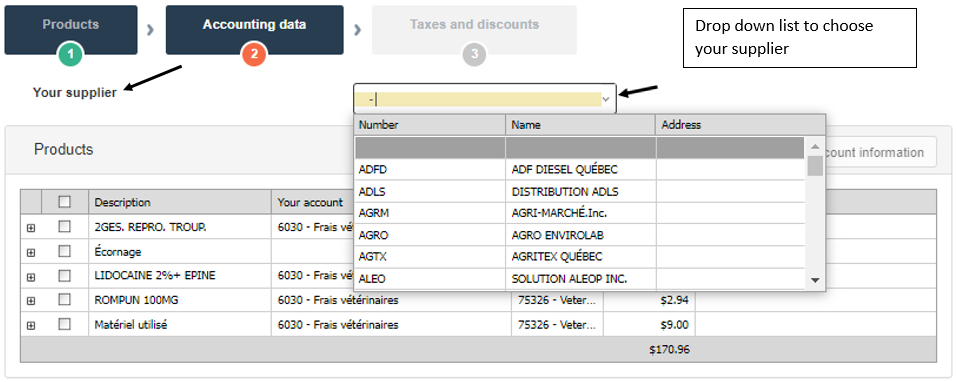
Step 2 — Accounting data: Based on the previously validated information, assign the accounting accounts for each item line. It is possible to return to a previous step without losing the validated information. You can also create a line split on one or more lines in this step. (See “Validation related functions”)
Step 3 – Taxes and discounts: This last step allows you to validate taxes paid on purchases as well as add a discount to the payment that may not have been recorded. Also, here you can create a line separation on tax lines. (See “Validation related functions")
Sales invoice
Step 1 — Sold items: Check that the information in the document header and sold item lines are correct. It is at this stage that you can make changes to the information that was read by the OCR.
Note: The items under the Product #, Description, Amount, Quantity and Unit of Measure columns are editable only in this screen.
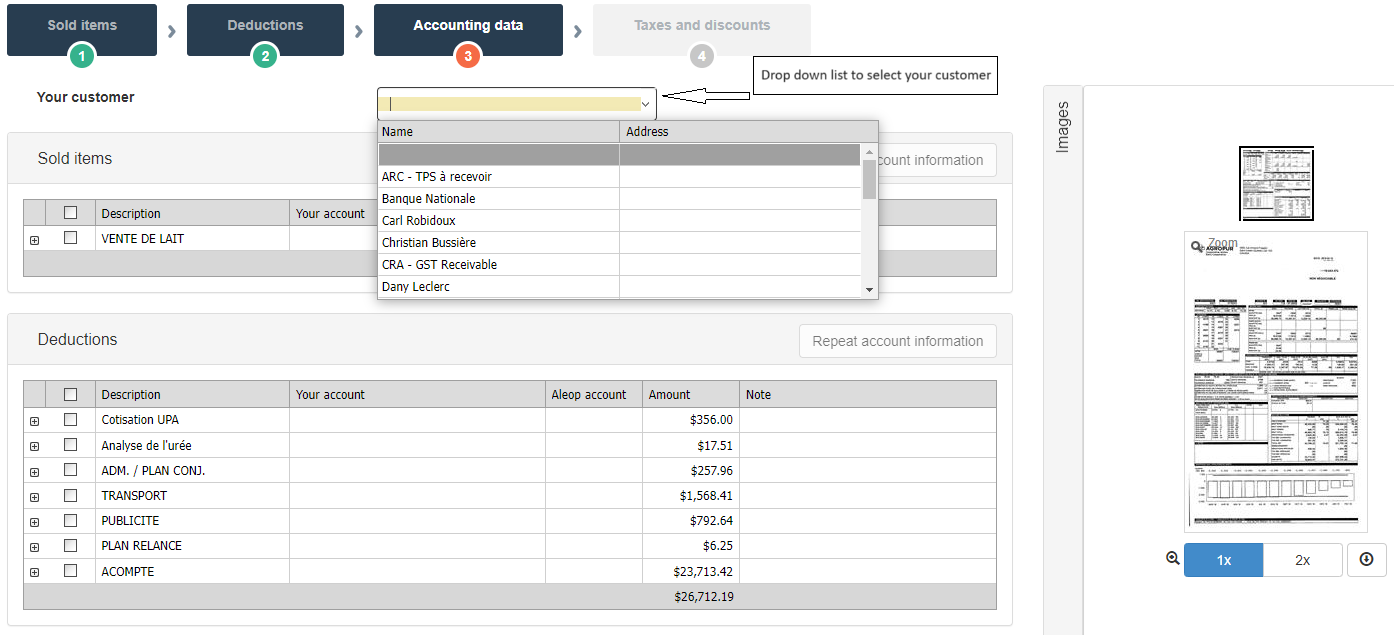
Step 2 — Deductions: Verify that the deduction information is correct. This grid can be empty if no deduction has been read on the document. It is at this stage that you can make changes to the information that was read by the OCR.
Note: The items under the Product #, Description, Amount, Quantity and Unit of Measure columns are editable only in this screen.
Step 3 – Accounting data: Based on the previously validated information, assign the accounting accounts for each item read. It is possible to return to a previous step without losing the validated information. You can also create a line separation on one or more lines in this step. (See "Validation related functions")
Step 4 – Taxes and discounts: This last step validates the taxes collected on sales and those paid on deductions. It is also possible to add a discount to a payment that would not have been recorded. Also, here you can create a line separation on tax lines. (See "Validation related functions")
Manual input Purchase / Sales
The validation of these documents is done by following the same steps as those specified above for purchase invoices and handwritten sales invoices/statements. The main difference is that the information must be entered manually. The advantage lies in associating content with an image and enhancing the "Transaction search" application even more.
Choice of partner
You must identify a partner for the document. By default, Aleop will suggest “Other partners”.
Step 1
You can also search in a list of your company's partner history and select one.
Step 2
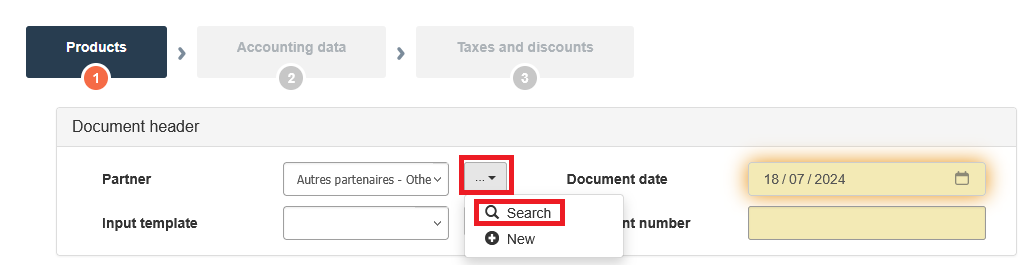
To consult your list of partners in the Aleop database, click on the "..." then on the magnifying glass.
This will take you to the following page. In the drop-down list, you can search by typing the name of the partner you are looking for. A partner can have several branches, you must then choose one of the available branches. If the partner you are dealing with does not exist in the history of your Aleop account, use “Other partners” and the invoice will be filed in that folder.
Payment and Incomings
To balance a transaction, the method of payment or reception of payment must be specified before transferring a transaction to the accounting system (credit or debit).
Note: onfirmation of payment and incoming payment serves as information to complete the entry to transfer to your accounting software. It does not generate the payment or incoming as such.
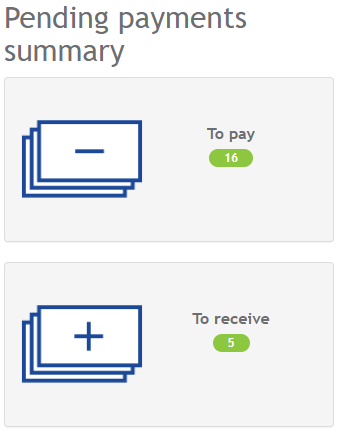
Payment and Incomings
After validating a document, the next step is to select the appropriate payment or collection method. This is the screen that will appear.
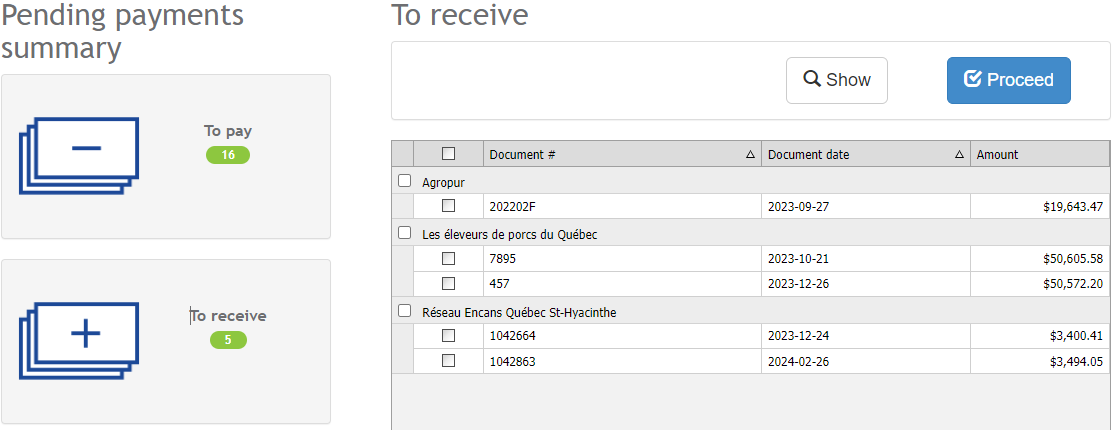
Select invoices to pay or receive payment
This step allows you to select the invoices to be processed. You must select invoices that will be processed via the same account (Bank account, supplier account, cash on hand, etc.)
Note: Depending on the type of accounting management and software, you may not have this button, or you may have access to incoming payment only. For the different types of management, the payment and/or collection is done in the validation step.
Carousel of selected documents
The document carousel allows you to view the documents selected and to unselect them if necessary.
Choice of incoming payment type
The incoming payment types displayed are the ones from the company's accounts charter that are eligible for making the counterpart (debit). Aleop relies on account matching to determine which accounts are displayed.
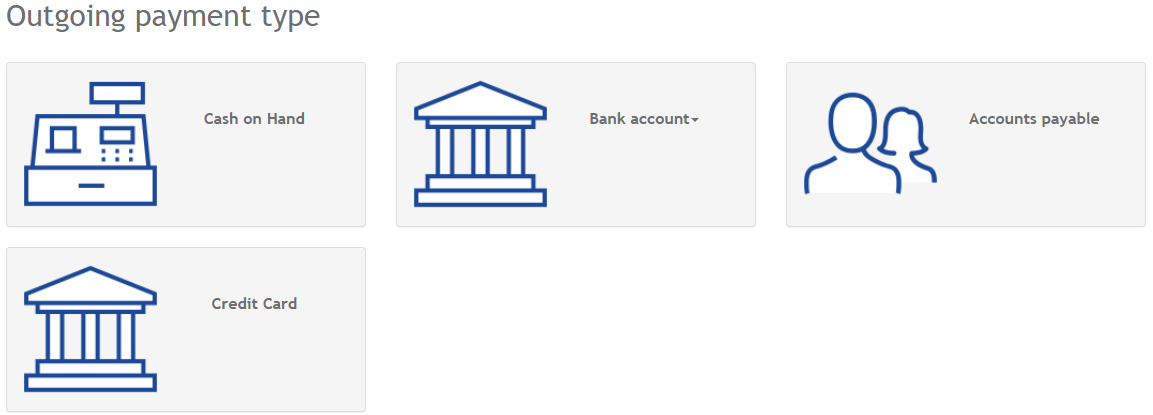
Choice of payment method
The payment methods displayed are the ones from the company's accounts charter that are eligible for making the counterpart (credit). Aleop relies on account mapping to determine which accounts are displayed.
Final payment and incomings
This type of transaction includes payments and incoming payments via cash on hand, bank accounts, prepaid expenses, income received in advance, withdrawals and contributions. The processing procedure in Aleop is the same for all these operations.
Notes:
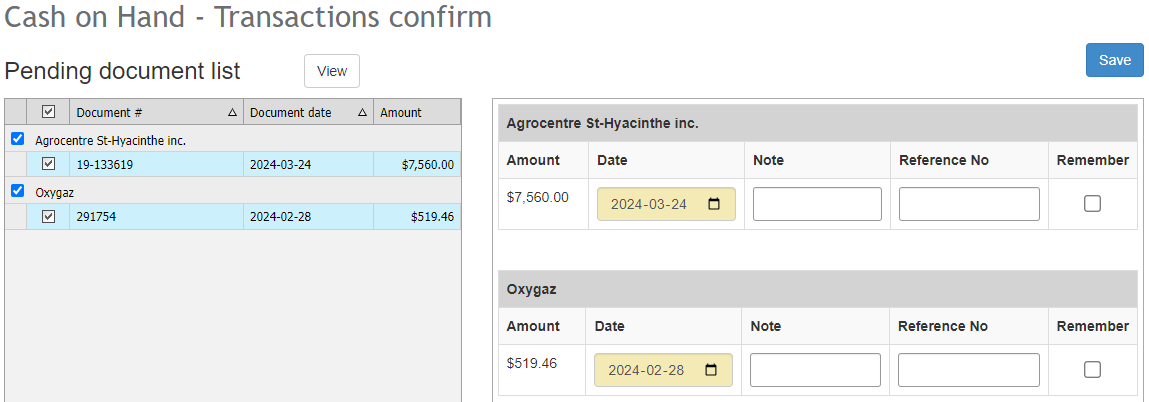
The date you indicate at this stage will be that of your entry in your accounting software.
By clicking on “Save”, the entries will be ready for transfer to your accounting software.
When selecting several invoices from the same partner, they add up automatically. It will then appear as a single entry in your accounting software, containing several invoices.
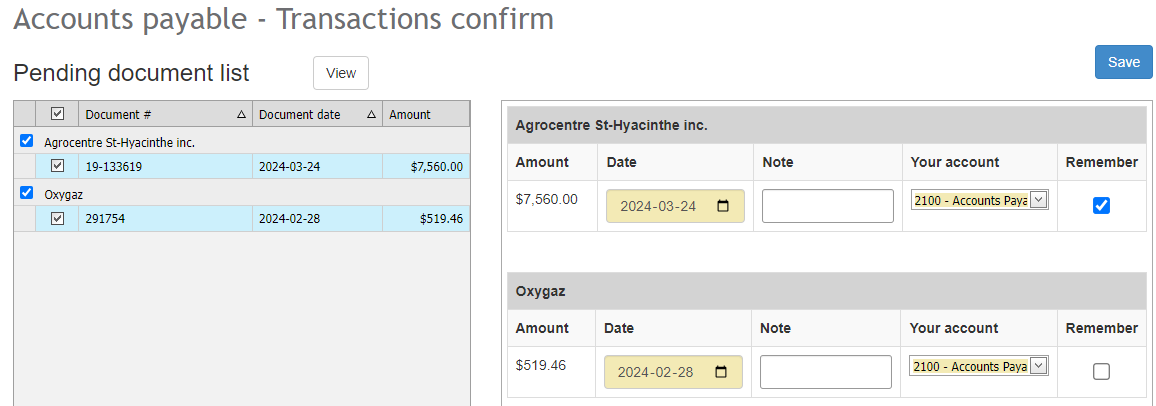
Accounts payable and accounts receivable
Payments and collections with these accounts are different, you must select the account where you want the transaction to be transmitted in your accounting software.
Notes:
The date you indicate at this step will be that of your entry in your accounting software.
By clicking on " Save ”, the entries will be ready for transfer to your accounting software.
By checking the box, " Remember " Aleop retains that you always pay this supplier via the chosen account. Following the validation of the next invoices from this partner, the entry will be prepared for your accounting software.
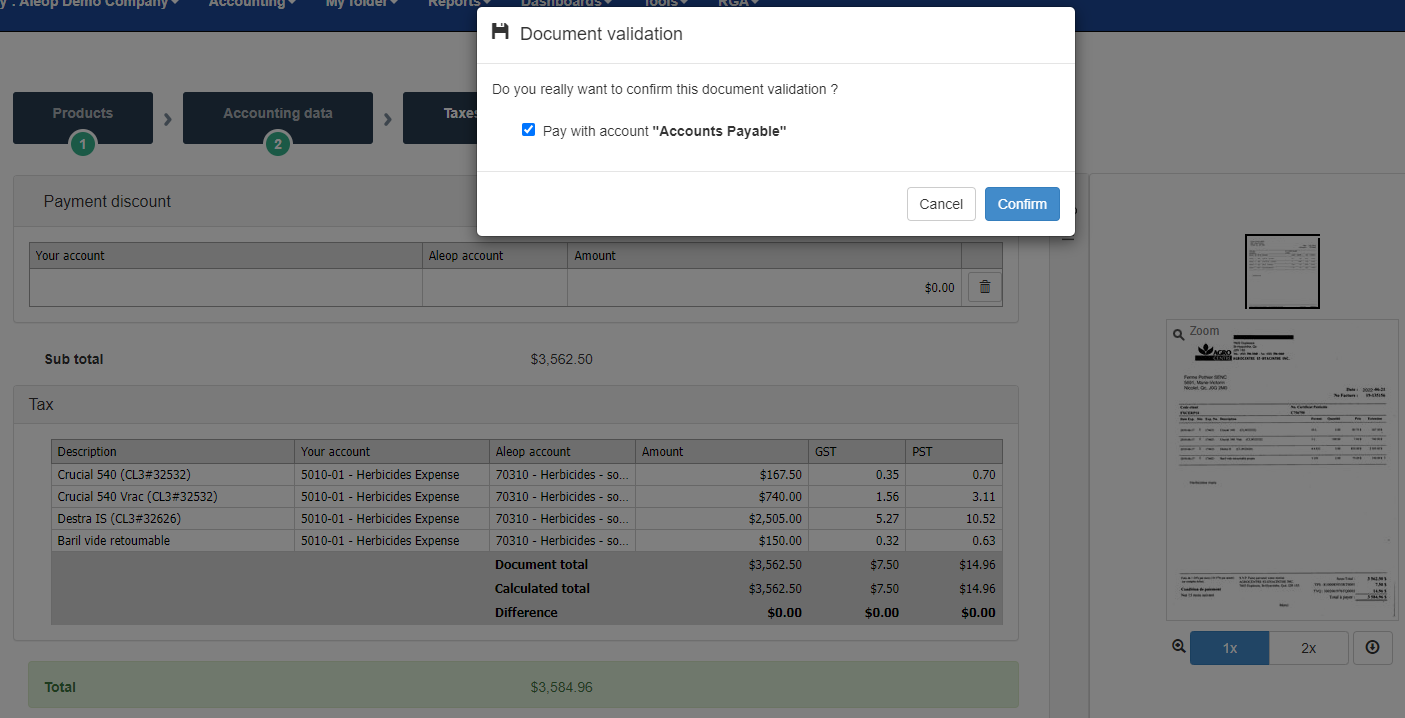
Modify or delete an automatic payment/incoming payment via an account
At the last validation step, i.e. when confirming document validation, you can uncheck the Pay with “…” account box. This will ensure that the invoice is not marked as paid automatically with partner accounts, therefor you can find it again at the Payment/Incoming payment step. You can then choose any payment method.
To change automatic payments, select the invoice and choose Accounts Payable mode.
If you uncheck the Remember box, automatic learning will stop and automatic payment for invoices from this supplier will not be suggested during validation.
If you modify the account, automatic learning will continue, and this account will be suggested later on.
Note: The same operation applies to the processing of sales via accounts receivable.
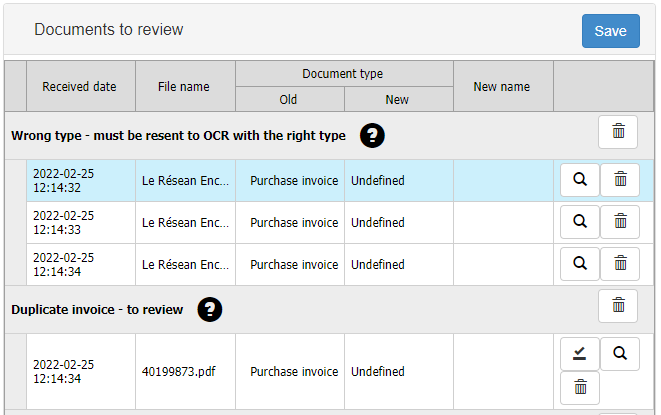
Documents to review
Document review screen
Types of anomalies
This module contains the purchase or sales documents for which an anomaly was detected during processing.
Insufficient quality – Must be entered manually
Background too grey
Handwritten documents with handwritten header
Handwritten documents with printed header, illegible amounts
Information obstructed by handwritten additions
Wrong type of document - must be sent back to OCR under the correct type
Purchase invoice identified as a sales invoice or vice-versa
Duplicate invoice
Invoice already sent through OCR processing and validated
Missing page(s) – Must be scanned in correct mode
Multi-page invoice, but scanned with the "1 page" option
Wrong scanning mode – Must be scanned with correct mode
Several one-page documents, but scanned with the "2 pages and more" option
Under review by the user
Since the document has been transferred for review by the user, it is up to the user to transfer it with the drop-down list of the document type “undefined”
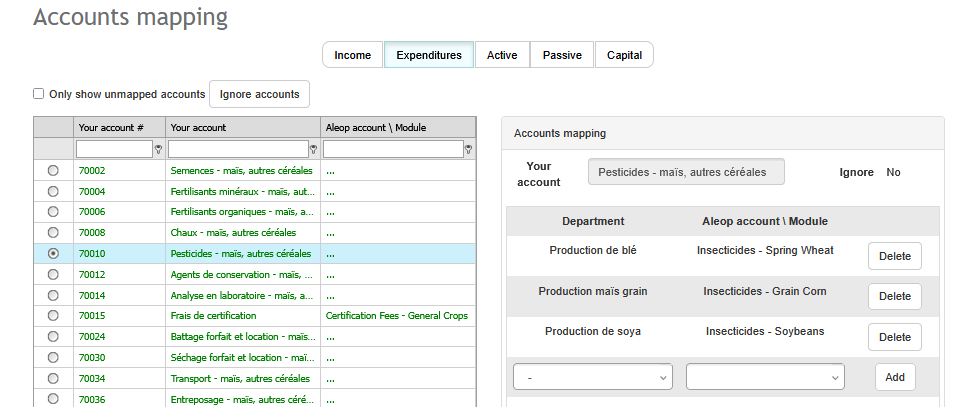
Accounts mapping
This module makes it possible to map corresponding accounts between the company's account charter and the Aleop charter. Aleop accounts that are available for account mapping depend on the productions that have been defined as "active" for the company.
General operation
To be available for validation, your accounting software + Department account combination must correspond to an Aleop account.
An account from your accounting software can be linked to several Aleop accounts.
An Aleop account can be linked to several accounts in your accounting software.
Deleting an account mapping has no impact on entries that have already been validated.
Adding or deleting an account or department
In the event of a change in the company's accounts charter, you must import the entries into your accounting software. During the synchronization between your accounting software and Aleop, modifications made in your accounts charter will be transmitted to Aleop. Once the synchronization has been completed, here are the actions to be taken according to the different cases.
Adding an account or a department
The account will be displayed in account mapping in red. You will have to complete its mapping to use it in validation or confirmation of method of payment/incoming payment.
Deleting an account or a department
All Aleop account mapping that was linked to this account will be deleted. Deleting a department may create unmapped accounts in your accounting software. In this case, you will have to specify the new account mapping with the Aleop charter of accounts.
Merging of an account
Account mergers are treated in Aleop as deleted accounts and the creation of a new account. Old mapping will therefore be deleted, and new ones will need to be assigned for the created account.
Adding or deleting auxiliaries and batches
Auxiliaries and batches have no impact on account mapping with the Aleop account charter. The same synchronization procedure must be carried out from your accounting software to update Aleop.
 Our solutions
 Integrations
 Acomba
 SigaFinance
 AgExpert
 Get a free demo
 Talk to an expert
 Automation
 Intelligent search and document filing
 Financial indicators
 Dairy Indicators
 Mobile app
 Data capture
 Intelligent data recognition
 Automatic transfer to your accounting software
 Electronic Data Interchange (EDI)
 Real-time dashboard
 12 months overview
 Personalized indicators
 Document digitization
 Seamless and secure integration
 Informative annotations
 Useful links
 Help & Support
 Blog
Blog Customer login
 FAQ
FAQ Technical support
 Contact us