 Our solutions
 Integrations
 Acomba
 SigaFinance
 AgExpert
 Get a free demo
 Talk to an expert
 Automation
 Intelligent search and document filing
 Financial indicators
 Dairy Indicators
 Mobile app
 Data capture
 Intelligent data recognition
 Automatic transfer to your accounting software
 Electronic Data Interchange (EDI)
 Real-time dashboard
 12 months overview
 Personalized indicators
 Document digitization
 Seamless and secure integration
 Informative annotations
 Useful links
 Help & Support
 Blog
Blog Customer login
 FAQ
FAQ Technical support
 Contact us
Sending documents
Modified on: June 8, 2026In most cases, a document sent to Aleop’s servers is automatically forwarded to the OCR engine, regardless of its type or source. The data it contains is extracted, analyzed, and transcribed without any manual intervention on your part. The goal is to eliminate manual accounting entry — Aleop’s technology takes care of it for you.
However, a document can optionally be sent to filing when scanned, and it will always be sent there when the company receives an email.
Aleop email
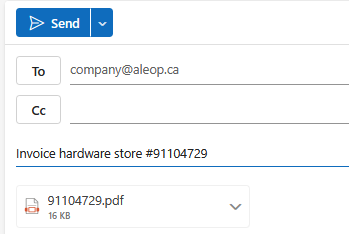
When creating an Aleop account, an email address in the format companyname@aleop.ca is created.
This address allows suppliers, customers, and yourself to send accounting documents (e.g. PDF invoices) directly to the web platform so they can be automatically extracted into Aleop. Documents can either be sent directly by suppliers to the Aleop address or manually forwarded by your company. Only attachments are retrieved. If the invoice is included in the body of the email, Aleop will not be able to process it.
This address is used solely for the automatic import of attachments:
- You do not have access to this email inbox.
- The content of the messages cannot be viewed.
- It is not possible to send messages from this address.
Files considered dangerous, such as executables (.exe), are automatically deleted. A delay of up to 5 minutes may occur before the attachments appear in Aleop.
Best practices
- Forward emails from your current inbox to the Aleop address to automate the retrieval of attachments.
- For partners who do not offer EDI services, you can ask them to send their accounting documents both to your current email address and to the Aleop address, allowing for the consultation of the associated messages.
- If documents are manually forwarded by your company, it is also possible to create a rule in your email inbox to automatically forward messages from suppliers that contain an attachment to the Aleop address.
Access to sent documents
Documents sent by email are automatically filed and accessible in Document status > Document classification > Email, sorted by sender.
To find the Aleop email address linked to the company:
- Access the Aleop main menu.
- Click on the company name.
- Select General information.
- In Company details, check the field Company email:.
Email sending conditions
Emails sent to Aleop must meet the following criteria:
- Attachment(s): PDF format only.
- Unsupported formats: .exe, .bat, .com, .cmd, .vbs, .vbe, .js, .jse, .wsh, .wsf, .psc1, .htm, .html.
- Single recipient: The email address must be @aleop.ca.
- Concise subject: Short and clear title.
- Minimal content: The email text is not processed by Aleop.
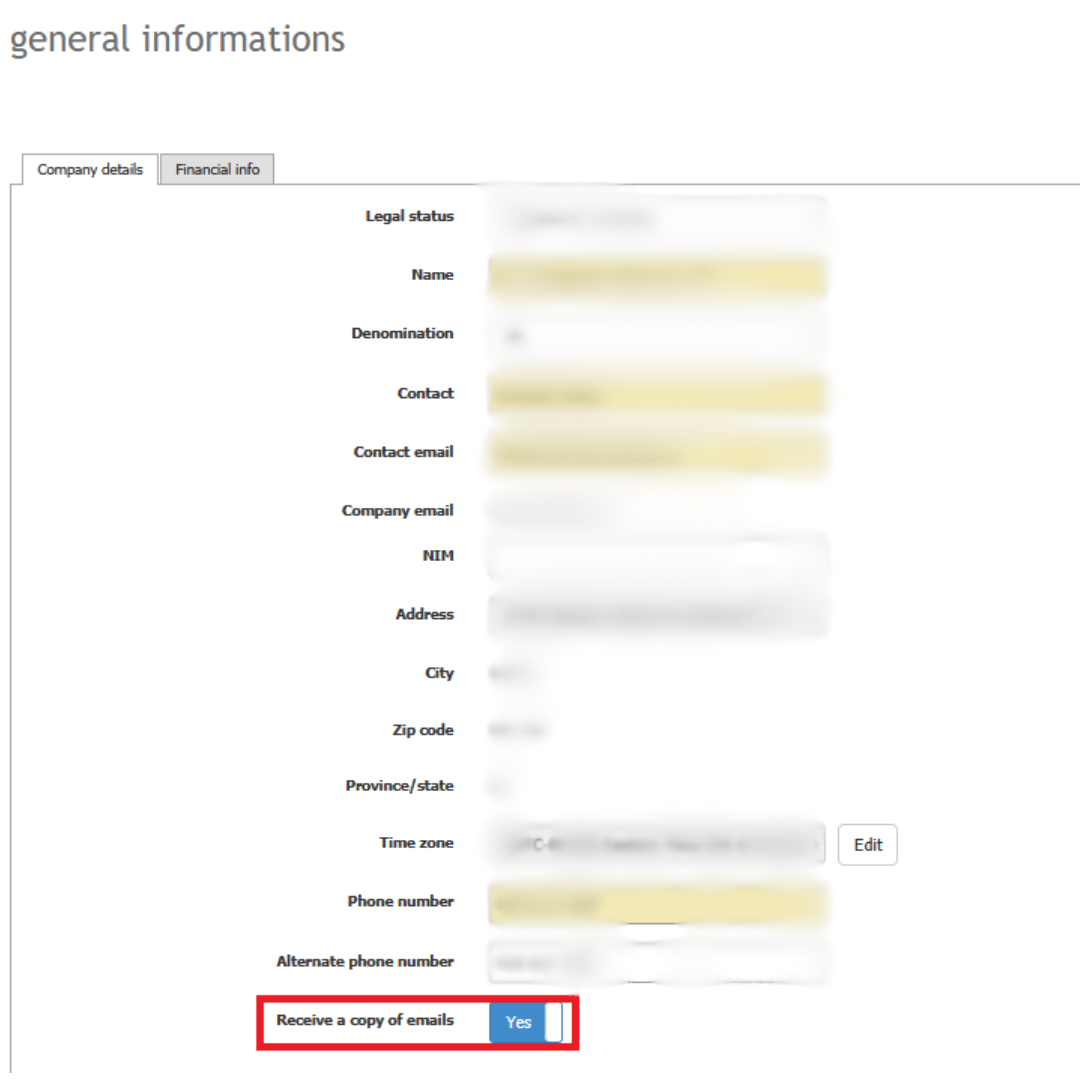
Email copy
To receive a copy of the emails sent to the address @aleop.ca :
- Access the menu General information.
- At the bottom of the page, enable the option Receive a copy of emails by selecting YES. The reception delay is approximately 15 minutes.
Procedure for sending by email
- Find your @aleop.ca email address
- In the main menu, go to General info > Company details to find the unique address linked to your account (e.g., mycompany@aleop.ca).
- Prepare your documents
- Clear and well-framed
- Use PDF files (1 file per invoice)
- Do not use screenshots or poor-quality photos
- Send your documents
- Recipient: your @aleop.ca address
- Only attachments are processed, not the email body
- Email subject: keep it short and clear
- Follow the technical requirements
- Accepted format: PDF files
- Minimum resolution: 300 dpi
- Black and white text
- No dangerous or executable files allowed
- Wait for automatic processing
- Processing may take a few hours for a document to be sent, extracted, and returned for validation.
- Automatic filing takes place only after the document has been validated.
- Find your documents in Aleop
- In Document status > Document classification select the source: Email
Scanning
The software analyzes black and white tones in “Text” mode to recognize characters and match them to words or numbers. Therefore, document straightness, tonal clarity, and scanning in “Text” mode are essential.
To avoid overloading the OCR, it’s important not to exceed 25 documents per email. For large volumes, consider spreading out the emails over time, grouped by periods (e.g., one month).
Scanning with a scanner or a multifunction printer
Requirements for a document readable by our Optical Character Recognition (OCR) system:
- Format: PDF or TIF/TIFF
- Document scanning: Black and white text mode (bitonal), not color or grayscale
- Resolution: Minimum 300 dpi
- Alignment: Document must be straight and properly framed
Scanners supported by Aleop:
- Kodak i1150
- Alaris E1025 / E1030
We provide support for the installation/configuration of these models only. For any other device (including multifunction printers), installation must be done by you or your technician. Aleop does not guarantee their compatibility or performance.
Integration with AleopClient:
If your scanner can produce TIF/TIFF files and allows you to set an output folder, we will assist you with the integration with AleopClient. Otherwise, send the files (TIF/TIFF or PDF) directly to your "@aleop.ca" email address.
Procedure for sending by scanner
- Prepare your documents
- Clear and well-framed
- Accepted formats: TIF/TIFF (1 file per invoice)
- Minimum resolution: 300 dpi
- Black and white text
- Scan and send with AleopClient
- If AleopClient is running, the images will be automatically transferred to the company folder.
- Depending on the configuration, files may be sent directly to Validation for purchase invoices and sales statements.
- Enter the missing information (company and destination) to send the document to the web folder.
- Wait for automatic processing
- After submission, it may take a few minutes for the servers to communicate and validate the legitimacy of the attachment. The document will then appear in the classification area or in the “Documents in treatment” section. Data extraction may then take a few hours before the document becomes available in the “Validation” section.
- Automatic filing takes place only after the document has been validated.
- Find your documents in Aleop
- In Document status > Document classification select the source: Scanning
Scanning with the Aleop mobile app
The Aleop mobile app allows you to capture an image of your accounting documents and send it directly to the document classification on the platform, offering a quick alternative to email or scanning. The submitted documents are automatically processed by Aleop, but validation takes place only on the web version. The app connects automatically to your Aleop account without any additional setup.
How to proceed:
- Open the Aleop app on your mobile device
Download it from the App Store or Google Play if you haven’t already. - Select the type of document
Specify whether your document is a purchase, a sale, or another type of document. - Capture an image of your document
Take a photo of the document directly within the app. It is also possible to add multiple pages by taking more than one capture. - Check the image quality
Make sure the document is readable, properly framed, and free of folds, reflections, or shadows. The text must be clearly visible. Also check that the result is adequate and that the app does not display any warning indicated by a red “i” icon. - Send the document to your Aleop account
Once you're satisfied with the image, tap Send. The file is automatically sent to your Aleop workspace and will be available for validation within the next few minutes. If the option Sales invoice or Purchase invoice is selected, the document will first appear in the “Documents in treatment” section, and then in the “Validation” section once the extraction is complete.
For complete information about our mobile application, see the dedicated guide.
Scanning with a third-party mobile app
You can use a mobile scanning app, provided it generates a document that meets the following criteria:
- Format: TIF/TIFF or PDF
- Mode: Black and white text (no color or grayscale)
- Resolution: Minimum 300 dpi
- One PDF file per document (even from the same supplier — invoices must be separate)
- Use a dedicated scanning app (not the default camera app)
- Document must be straight, properly framed, and cropped
- Avoid folds, glare, shadows, and any elements obstructing the text (e.g., payment stubs)
- If possible, send the PDF directly to your "@aleop.ca" email address
Useful features (sometimes paid) offered by certain apps:
- Automatic glare and shadow correction
- Sharpness enhancement
- Imperfection removal
- Smart rotation and automatic edge detection
Important: You are responsible for the quality of the PDF. An unreadable document will be returned under "Review" status and will count toward your license. If the document does not meet the requirements, you can also enter the information manually during the "Validation" step.
Electronic Data Interchange (EDI)
Electronic Data Interchange (EDI) refers to the automated exchange of documents between computer systems, without manual input. In Aleop’s case, the integrated EDI only processes purchase invoices and sales statements.
Documents sent via Electronic Data Interchange (EDI) are routed directly to the validation stage, bypassing preliminary processing steps and without using up any document processing licenses.
This type of document is only available through partners with an integrated EDI system, enabling automated and error-free information exchange.
EDI disponibles
- Sollio – Requires an active AgConnexion account.
- Agri-Marché / Lactech
- EPQ
The EDI connection setup is done directly from your Aleop account. Each integration has its own set of instructions, available from the configuration interface. It’s important to follow the steps specific to each provider to ensure proper data synchronization.

Receiving certificates via EPQ’s EDI
When using EDI to receive your certificates, it is important to understand how it works and the possible delays.
Generation and availability of certificates
Certificates must first be generated by EPQ and made available in their portal before they can be transmitted through EDI. As long as the certificate is not available in the portal, it cannot be retrieved.
Automatic retrieval by Aleop
Once a certificate is available in EPQ’s EDI portal, Aleop retrieves it automatically.
- Retrieval takes place once per night.
- The certificate generally becomes visible the day after it is made available in EDI.
Typical reception delays
The delay between the invoice date and the reception of the certificate in Aleop varies depending on EPQ’s practices.
- General average: about 4.5 days.
- Possible range: same day up to 7 days.
Impact of the payment date
The payment date shown on the certificate determines when EPQ makes it available through EDI.
- Example: a certificate dated August 8 with a scheduled payment on September 2 will be available in EDI on September 2 and automatically retrieved by Aleop on September 3.
- This means EPQ does not release certificates before the scheduled payment date.