 Our solutions
 Integrations
 Acomba
 SigaFinance
 AgExpert
 Get a free demo
 Talk to an expert
 Automation
 Intelligent search and document filing
 Financial indicators
 Dairy Indicators
 Mobile app
 Data capture
 Intelligent data recognition
 Automatic transfer to your accounting software
 Electronic Data Interchange (EDI)
 Real-time dashboard
 12 months overview
 Personalized indicators
 Document digitization
 Seamless and secure integration
 Informative annotations
 Useful links
 Help & Support
 Blog
Blog Customer login
 FAQ
FAQ Technical support
 Contact us
Annotations
Modified on: November 1, 2024An annotation allows for the recording of important details regarding a document, whether it pertains to accounting or is simply available in the binder. Annotations can also facilitate the sharing of information with other individuals who have access to the business. There are two distinct types of annotations: the general annotation and the payment and receipt annotation.
The annotation can be created and viewed in any section of the software from the annotation button ![]() , anywhere a document can be viewed.
, anywhere a document can be viewed.

The information is for informational purposes only; it will not be part of the accounting entry and will not alter the document.
General Annotation
- Click on the annotation button
 visible in the document view or in the document carousel;
 - Select General Annotation;
- Enter text and select the desired format (Size, Font, Bold, Italic, Underline, etc.)
- Click on Save.
The general annotation allows you to add text information to a document.

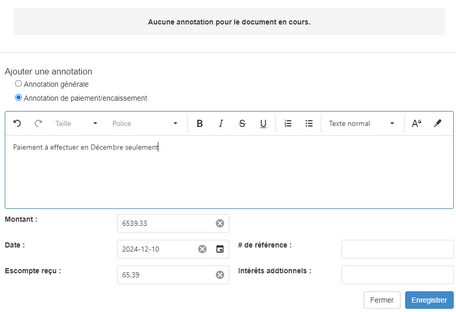
Payment & Receipt Annotation
The payment & receipt annotation is used, among other things, to add qualitative information about the payment or receipt of the document. This information will not be recorded in the accounting entry or during the payment/receipt of the document. It has the same overall functionalities as the general annotation, in addition to the extra information.
Thus, in the list of documents pending payment or receipt, or in the list of documents to be validated, an information bubble ![]() appears to indicate that a payment or receipt annotation is present on the document. The bubble is also present directly on a document in step #1 of the validation process.
appears to indicate that a payment or receipt annotation is present on the document. The bubble is also present directly on a document in step #1 of the validation process.
Hover over the bubble ![]() , a maximum of 2 annotations appear.
, a maximum of 2 annotations appear.
To display the remaining annotations, click on the information bubble.

The required fields for the annotation are Amount and Date.
The following information is optional:
- The description
- Reference #
- Additional interests
- Discount received

Observation
The observation notifies, according to the desired configurations, when a new annotation is added to a document. The observation is managed by document and can be activated even if the document does not contain an annotation.
To observe a document, click on the button Enable observation.

See the section Notification for its configuration.
Click on Close to save the change without adding an annotation
Mentions
The mention allows you to add the name of a user while sending a notification to the mentioned user according to their configurations.
The mention is added in the description by typing @ using the keyboard in front of the name of the user you want to mention. The list of users appears, and you can select a user.
To be part of the mention list, the user must have access to the business.


Notifications
The user can choose to receive notifications from Mentions or Observation.
The notification settings are configured in the menu Folder / Annotation Search / Button ![]() .
.
Enable or disable with the button YES/NO.

By messaging : The notification informs you that you have been mentioned via Aleop's internal messaging (letter icon at the top right of the screen). Clicking on the link displays the document.

By text message : The notification informs you via a text message that you have been mentioned. Clicking on the link displays the document.

By email : The notification informs you via the email associated with your user account that you have been mentioned. Clicking on the link displays the document.

View and Display Order
To view the annotation screen, the document must first be in view mode.
The annotation button present in the document view is black ![]() If no annotation is present and the button is green
If no annotation is present and the button is green ![]() if at least one annotation is present on the document.
if at least one annotation is present on the document.
The display order of annotations can be selected in the annotation window to view the oldest or most recent first.

The order will be saved for all annotations (current and future) until a change is made.
Modification and Deletion
You can modify or delete your own annotation.
Annotations from other users cannot be modified or deleted.

In a conversation, click on the Edit ![]() icon of an annotation.
icon of an annotation.
Edit the information and click on Save.
Pour supprimer une annotation, cliquer sur l’icône Delete ![]() icon of an annotation.
icon of an annotation.

Annotation Search
La recherche d’annotation permet de rechercher par le texte, la mention et/ou la date d'une annotation de tous les utilisateurs et tous les éléments possibles faisant partie de celle-ci.
The feature is available from the menu File Explorer / Annotation search.
Without Annotation
It is possible to search for documents that do not have any annotations.
The Ignore allows you to ignore a document so that it no longer appears in searches without subsequent annotations.
The search is possible via the Date of Creation of the document and/or the Partner.
It is also possible to batch annotate documents. (See the section Batch Annotation).

General
La recherche d’annotation générale se fait via la Date of Creation of the document, the Partner, the Author and/or a user Mentioned.
Click on Search to obtain all annotations that meet the criteria.
Documents with multiple general annotations will appear in the results as many times as the number of general annotations present on a document.

Payment/Receipt
The search for Payment/Receipt annotation is done via the Date of Creation, the Partner, the Author and/or a user Mentioned as well as all criteria related to payment/receipt: Date, Reference # and/or Amount.

Batch Annotation
Batch payment annotation is available from any search result to obtain the same annotation for multiple documents associated with the same partner. It is important to note that documents without an associated partner can also be selected.
- Select the documents
- Click on Annotate
- Add or modify the amount Paid/Received (For informational purposes only, not recorded in the actual calculation or during the payment/receipt process)
- Add a Comment (Text) if necessary.
- Add a Amount AND a Date (Mandatory)
- If necessary, you can add a Discount Received, a Reference # and/or some Additional Interests.

Note:: All information in the annotation is for justification purposes only and is not taken into account in the calculation of payment/receipt.
Annotation Notification Settings
To set up your own mention or subscription notifications, access them through the screen File Explorer / Annotation search.
Click on the icon, ![]() and choose between Mentions and Subcriptions, then activate the desired notifications (Email, Messaging, or Text). For text notifications, make sure you have entered and validated the cell phone number via the icon Settings
and choose between Mentions and Subcriptions, then activate the desired notifications (Email, Messaging, or Text). For text notifications, make sure you have entered and validated the cell phone number via the icon Settings ![]() , then user information. Click on Save when finished.
, then user information. Click on Save when finished.
Each notification will contain a link directing to the annotated document.
